Let's walk through creating a table in a Microsoft Access database. Note that the
illustrations below were made using Microsoft Access 2010. Earlier versions of Access
may vary some from what you see illustrated here.
When you create a brand new blank database, Microsoft Access 2010 will assume that
the first thing you are going to want to do is create a table. So, it goes ahead
and starts that process off for you, as you can see below. You will see that it
has started to create a table named Table1 and has opened it in datasheet view:

Design View
We could begin adding fields to our table right here in datasheet view. But let's
switch to design view and continue working on our table there. To switch to design
view, we will right-click the Table1 tab and then choose "Design View":

Here, we are asked to name our new table. We could keep it with the default Table1
name, but instead, let's give it a more meaningful name. Let's say that the table
we want to create is going to be used to contain data on our customers. So, we'll
name it "Customer":

Primary Key
Microsoft Access has chosen to create a primary key for our table as an AutoNumber
data type. It has given it the default name "ID":
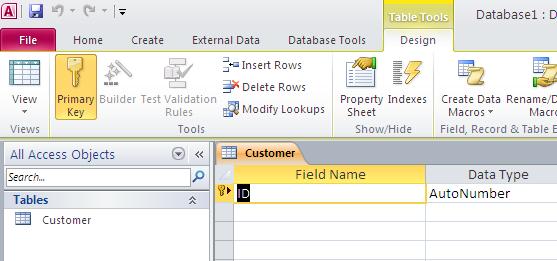
We'll keep the AutoNumber data type, but let's assume that for this database we
want to follow the convention of naming primary keys in our tables using tablename + "Id".
So, we'll name the primary key "CustomerId".

Other Fields
Now we will add the next field in our table, "CustName". We'll make this a text
field with a maximum length of 100 characters:

Now we'll add some more fields to round out our Customer table. We can always come
back later and add additional fields if needed:

We'll save using the save icon in the upper left corner of the screen:

Now we'll close the table. If we forget to save before closing, Microsoft Access
will prompt us to save

Datasheet View
Let's open the table in the default datasheet view to see how it looks. To do so,
we will right-click the Customer table and choose "Open":

We now see our finished table in datasheet view:

At this point we could tab through the fields and begin entering data right here:

However, it might be nicer for our users if we create a Microsoft Access Form for
data entry / maintenance purposes.